How to use Shipping Rules
11 minute read
What you’ll learn
In this article you’ll learn about the Shipping Rules Engine, specifically:
- What Shipping Rules are & who can use them
- The primary objects that make up Shipping Rules
- The queries and mutations that can be used to manage Shipping Rules
IMPORTANT
While as a seller you can create your own shipping rules, ultimately it is up to the marketplace operator whether they are used or not. Please reach out to your marketplace seller onboarding team for more information on how shipping rules are being used.What are Shipping Rules?
Shipping Rules allow you to determine the rate you charge for a purchased item based on where you are going to send it (Shipping Zone) and an applicable Shipping Profile (e.g. Weight, size, delivery time slot etc.). The table below summarizes the entities that make up a Shipping Rule, along with some other information:
| Entity | Purpose | Created By | GraphQL Object |
|---|---|---|---|
| Shipping Rate | The cost (rate) that can be applied by the rule. You can define multiple rates. | Operators (Admins) or Sellers | ShippingRate |
| Shipping Zone | A zone is made up of a list of Zip or Post codes that defines a geographic area. | Operators (Admins) or Sellers | ShippingZone |
| Shipping Profile | Determined by the Operator only, a Shipping Profile will typically relate to the size, weight or delivery time slot for the purchased item, but can be “anything”. Shipping Profiles are defined on the Advert Variants | Operators (Admins) only | ShippingProfile |
| Shipping Rule | Comprised of: Shipping Rates, Shipping Zones and Shipping Profiles | Operators (Admins) or Sellers | ShippingOption |
Object Relationships
To further detail how Shipping Rules (referred to as Shipping Options in the GraphQL API) are constructed, it can be useful to look at the relationships between the primary objects:
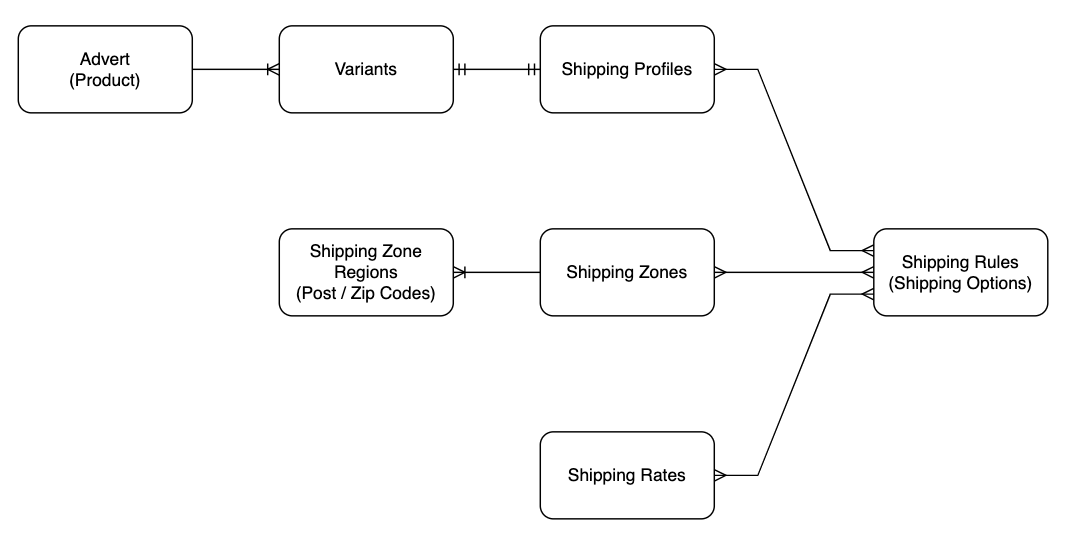
While all the relationships are important, the key call out from this diagram is the relationship between: variants <-> shipping profiles <-> shipping rules. In essence:
- The marketplace operator defines the Shipping Profiles E.g.:
Small (<= 5kg)Medium (> 5kg <= 10Kg)Large (> 10Kg)
- Operators and Sellers can then create Shipping Rules, that encompass:
- The Shipping Profile
- The Shipping Rates
- The Shipping Zones
- When sellers create products, they can assign a Shipping Profile to the product variants
- Then when variants are selected for purchase you can determine the relevant shipping rules for that variant (noting that there may be multiple shipping rules for each variant)
Calculating the shipping cost
Shipping rules provide a reference data framework for operators and sellers to use, but it is up to the operator at the point of checkout to determine the appropriate shipping cost based on the shipping rule data, as well as other data inputs such as the customer’s delivery address.Creating Shipping Rules
Operator Vs Seller Rules
Before creating Shipping rules as a Seller, you should check with your marketplace seller onboarding team whether:
- Shipping rules are being used
- If they are being used whether:
- You can create your own rules (including defining zones and rates)
- You should use operator defined rules
The remainder of this article assumes that as a seller, you can create your own rules.
Step 1: Retrieving Shipping Profiles
As detailed above, it is the shipping profile that acts as the linchpin between the variant and the relevant shipping rules (or “options”). However it is only the marketplace operator that can create shipping profiles, even if as a seller you are going to create your own zones, rates and rules.
For the example we are going to follow in this article, we’ll assume that the operator has already created the following profiles.
Small (<= 5kg)Medium (> 5kg <= 10Kg)Large (> 10Kg)
You can query the shipping profiles available to you by using the following query:
query {
  shippingProfiles(first: 10) {
    totalCount
    pageInfo {
      hasNextPage
      endCursor
    }
    nodes {
      id
      name
    }
  }
}
In this case this should return the following:
{
  "data": {
    "shippingProfiles": {
      "totalCount": 3,
      "pageInfo": {"hasNextPage": false, "endCursor": "Mw"},
      "nodes": [
        {"id": "U2hpcHBpbmdQcm9maWxlLTc=", "name": "Large (> 10Kg)"      },
        {"id": "U2hpcHBpbmdQcm9maWxlLTY=", "name": "Medium (>5Kg <=10Kg)"},
        {"id": "U2hpcHBpbmdQcm9maWxlLTU=", "name": "Small (<= 5Kg)"      }
      ]
    }
  }
}
Step 2: Creating Shipping Zones
Next up we’ll create some shipping zones, that are one or more zip /postal codes. The operator can then use this data at checkout and cross-reference with the customer’s delivery address to help determine the appropriate shipping rate.
In this example we are going to use the shippingZoneCreateOrUpdate mutation to create the following shipping zones:
- Zone A: Metro Springfield
- Zone B: Rural Springfield
- Zone C: Metro New New York
- Zone D: Rural New New York
Zip / Post Codes
For each zone we need to provide a list of zip / post codes that we will provide as a Base64 encoded csv.
An example csv file for Zone A - Metro Springfield in its non-encoded format is shown below:
Postcode
30001
30002
30003
30004
Base64 encoding this file will result in the following string:
UG9zdGNvZGUKMTAwMDEKMTAwMDIKMTAwMDMKMTAwMDQ=
With this data we can now call shippingZoneCreateOrUpdate
mutation {
  shippingZoneCreateOrUpdate(
    input: {
      attributes: {
        name: "Zone A: Metro Springfield"
        description: "Areas of Springfield that are served by the monorail."
        spreadsheet: {
          dataBase64: "UG9zdGNvZGUKMTAwMDEKMTAwMDIKMTAwMDMKMTAwMDQ="
          filename: "metro_springfield.csv"
        }
      }
    }
  ) {
    clientMutationId
    shippingZone {
      id
      name
      postcodes
      seller {
        businessName
      }
    }
    errors {
      field
      messages
    }
  }
}
For brevity, the above example is not employing variables to pass data to the mutation which is the recommended approach. The API collections follow this method.
The resulting return payload for this mutation call is shown below:
{
  "data": {
    "shippingZoneCreateOrUpdate": {
      "clientMutationId": null,
      "shippingZone": {
        "id": "U2hpcHBpbmdab25lLTg=",
        "name": "Zone A: Metro Springfield",
        "postcodes": [
          "30001",
          "30002",
          "30003",
          "30004"
        ],
        "seller": {
          "businessName": "Cell Phones 4U"
        }
      },
      "errors": null
    }
  }
}
We’ll repeat this mutation call for the remaining 3 zones.
If you get the following error when you try to create the shipping zone:
{
  "data": {
    "shippingZoneCreateOrUpdate": {
      "clientMutationId": null,
      "shippingZone": null,
      "errors": [
        {
          "field": "",
          "messages": [
            "Marketplace wide shipping rules enabled for account"
          ]
        }
      ]
    }
  }
}
It means that you have elected to use the marketplace wide rules. You can turn this setting off in the Seller Portal, under the “Shipping” menu, selecting “Shipping Rules” then toggling the “Use marketplace name defined Shipping Rules” option.
NOTE: Again you should confirm with your marketplace seller onboarding team that seller-define rules can be used before toggling off this option.
Using the shippingZones query, you can check to see that we have created all zones correctly:
query getShippingZOnes {
  shippingZones(first: 2, after: null) {
    totalCount
    pageInfo {
      hasNextPage
      endCursor
    }
    nodes {
      id
      name
      description
      postcodes
      seller {
        id
        businessName
      }
    }
  }
}
This should return something similar to the following, (noting that in the above query we requested the first 2 shipping zones only):
{
	"data": {
		"shippingZones": {
			"totalCount": 8,
			"pageInfo": {
				"hasNextPage": true,
				"endCursor": "Mg"
			},
			"nodes": [
				{
					"id": "U2hpcHBpbmdab25lLTg=",
					"name": "Zone A: Metro Springfield",
					"description": "Areas of Springfield that are served by the monorail.",
					"postcodes": [
						"30001",
						"30002",
						"30003",
						"30004"
					],
					"seller": {
						"id": "U2VsbGVyLTI=",
						"businessName": "Cell Phones 4U"
					}
				},
				{
					"id": "U2hpcHBpbmdab25lLTU=",
					"name": "Zone 1 - Metro Gotham",
					"description": "Areas of Gotham served by the metro rail network",
					"postcodes": [
						"10001",
						"10002",
						"10003",
						"10004"
					],
					"seller": null
				}
			]
		}
	}
}
You can see from the above response that the marketplace operator has been creating shipping zones as well, in this case Zone 1 - Metro Gotham, you can determine this because the seller object has returned
nullfor this zone.
Step 3: Creating Shipping Rates
The next step is to determine the Shipping Rates we want to have, in this example we are going to have 4:
- Standard Metro - $5
- Express Metro - $10
- Standard Rural - $10
- Express Rural - $20
Calling the shippingRateCreateOrUpdate mutation in the following way, we can create our first rate:
mutation createShippingRates {
  shippingRateCreateOrUpdate(
    input: { attributes: { name: "Standard Metro", rate: "5" } }
  ) {
    errors {
      field
      messages
    }
    shippingRate {
      id
      name
      rateCents
    }
  }
}
This will return the following payload:
{
  "data": {
    "shippingRateCreateOrUpdate": {
      "errors": null,
      "shippingRate": {
        "id": "U2hpcHBpbmdSYXRlLTE2",
        "name": "Standard Metro",
        "rateCents": 500
      }
    }
  }
}
We’ll repeat this mutation call for the remaining 4 rates.
Using the shippingRates query, you can check to see that we have created all rates correctly:
query getShippingRates {
  shippingRates(first: 4, after: null) {
    nodes {
      name
      id
      rateCents
      seller {
        businessName
        id
      }
    }
  }
}
This should return something similar to the following:
{
  "data": {
    "shippingRates": {
      "nodes": [
        {
          "name": "Standard Rural",
          "id": "U2hpcHBpbmdSYXRlLTE5",
          "rateCents": 1000,
          "seller": {
            "businessName": "Cell Phones 4U",
            "id": "U2VsbGVyLTI="
          }
        },
        {
          "name": "Express Rural",
          "id": "U2hpcHBpbmdSYXRlLTE4",
          "rateCents": 2000,
          "seller": {
            "businessName": "Cell Phones 4U",
            "id": "U2VsbGVyLTI="
          }
        },
        {
          "name": "Express Metro",
          "id": "U2hpcHBpbmdSYXRlLTE3",
          "rateCents": 1000,
          "seller": {
            "businessName": "Cell Phones 4U",
            "id": "U2VsbGVyLTI="
          }
        },
        {
          "name": "Standard Metro",
          "id": "U2hpcHBpbmdSYXRlLTE2",
          "rateCents": 500,
          "seller": {
            "businessName": "Cell Phones 4U",
            "id": "U2VsbGVyLTI="
          }
        }
      ]
    }
  }
}
Step 4: Define your Shipping Rules
This is the step where we bring it altogether and create some Shipping Rules using:
- Shipping Profiles
- Shipping Zones
- Shipping Rates
We are going to create the following rules
| Rule | Profile | Zones | Rates |
|---|---|---|---|
| Standard Metro | Small (<= 5Kg) Medium (> 5kg <= 10Kg) Large (> 10Kg) | - Zone A - Metro Springfield - Zone C - Metro New New York | Standard Metro |
| Express Metro | Small (<= 5Kg) Medium (> 5kg <= 10Kg) Large (> 10Kg) | - Zone A - Metro Springfield - Zone C - Metro New New York | Express Metro |
| Standard Rural | Small (<= 5Kg) Medium (> 5kg <= 10Kg) Large (> 10Kg) | - Zone B - Rural Springfield - Zone D - Rural New New York | Standard Rural |
| Express Rural | Small (<= 5Kg) Medium (> 5kg <= 10Kg) Large (> 10Kg) | - Zone B - Rural Springfield - Zone D - Rural New New York | Express Rural |
Custom Fields
If custom fields have been defined by the marketplace operator you can set values for these at the point when you create your rule. However, to do that you’ll need to obtain the relevant custom field IDs using the following query:
query {
  entityCustomFieldGroups(first: 100) {
    totalCount
    pageInfo {
      hasNextPage
      endCursor
    }
    nodes {
      entity
      customFields {
        nodes {
          id
          name
        }
      }
    }
  }
}
Note: Only operators can define custom field types, sellers can only set values for those fields that have been defined by the operator.
To create our first rule (Standard Metro) we can call the shippingOptionUpsert mutation in the following way:
mutation {
  shippingOptionUpsert(
    input: {
      attributes: {
        name: "Standard Metro"
        description: "Flat standard delivery charge within metro areas for any size package"
        shippingZoneIds: [
          "U2hpcHBpbmdab25lLTEx",
          "U2hpcHBpbmdab25lLTk="]
        shippingRateIds: ["U2hpcHBpbmdSYXRlLTE2"]
        shippingProfileIds: [
          "U2hpcHBpbmdQcm9maWxlLTc="
          "U2hpcHBpbmdQcm9maWxlLTY="
          "U2hpcHBpbmdQcm9maWxlLTU="
        ]
        customFieldValues: [
          {
            customFieldId: "Q3VzdG9tRmllbGQtNw==",
            value: "Not Insured" }
        ]
      }
    }
  ) {
    errors {
      field
      messages
    }
    shippingOption {
      id
      name
    }
  }
}
This will return a payload as follows:
{
  "data": {
    "shippingOptionUpsert": {
      "errors": null,
      "shippingOption": {
        "id": "U2hpcHBpbmdPcHRpb24tMTQ=",
        "name": "Standard Metro"
      }
    }
  }
}
We’ll repeat this mutation call for the remaining 3 shipping options / rules.
Using the shippingOptions query, you can check to see that we have created all rates correctly:
query {
  shippingOptions(first: 1, after: null) {
    totalCount
    pageInfo {
      endCursor
      hasNextPage
    }
    nodes {
      id
      name
      type
      shippingRates(first: 10) {
        nodes {
          id
          name
          rateCents
        }
      }
      shippingProfiles(first: 10) {
        nodes {
          id
          name
          description
        }
      }
      shippingZones(first: 10) {
        nodes {
          id
          name
          postcodes
        }
      }
      id
      seller {
        id
        businessName
      }
    }
  }
}
This should return something similar to the following (note we’ve only show the first page of shipping option data given the size of the payload):
{
  "data": {
    "shippingOptions": {
      "totalCount": 8,
      "pageInfo": {
        "endCursor": "MQ",
        "hasNextPage": true
      },
      "nodes": [
        {
          "id": "U2hpcHBpbmdPcHRpb24tMTQ=",
          "name": "Standard Metro",
          "type": "seller",
          "shippingRates": {
            "nodes": [
              {
                "id": "U2hpcHBpbmdSYXRlLTE2",
                "name": "Standard Metro",
                "rateCents": 500
              }
            ]
          },
          "shippingZones": {
            "nodes": [
              {
                "id": "U2hpcHBpbmdab25lLTk=",
                "name": "Zone A: Metro Springfield",
                "postcodes": [
                  "3000",
                  "3001",
                  "3002",
                  "3003",
                  "3004"
                ]
              },
              {
                "id": "U2hpcHBpbmdab25lLTEx",
                "name": "Zone C: Metro New New York",
                "postcodes": [
                  "4001",
                  "4002",
                  "4003",
                  "4004",
                  "4005"
                ]
              }
            ]
          },
          "seller": {
            "id": "U2VsbGVyLTI=",
            "businessName": "Cell Phones 4U"
          }
        }
      ]
    }
  }
}
Step 5: Applying Shipping Profiles to Products
Having set up our Shipping Rules we now want to start to associate them to our products, either when we create them, or update them.
In the example that follows we are going to use the variantUpdate mutation to update an existing product (aka advert) variant with a shipping profile id.
For a full tutorial on how to create products please refer to this article.
mutation {
  variantUpdate(
    input: {
      variantId: "VmFyaWFudC0yOQ=="
      attributes: { shippingProfileId: "U2hpcHBpbmdQcm9maWxlLTc=" }
    }
  ) {
    variant {
      id
      shippingProfile {
        id
        name
      }
      shippingOptions(first: 10) {
        totalCount
        nodes {
          name
        }
      }
    }
  }
}
This should return the following:
{
  "data": {
    "variantUpdate": {
      "variant": {
        "id": "VmFyaWFudC0yOQ==",
        "shippingProfile": {
          "id": "U2hpcHBpbmdQcm9maWxlLTc=",
          "name": "Large (> 10Kg)"
        },
        "shippingOptions": {
          "totalCount": 4,
          "nodes": [
            {
              "name": "Express Rural"
            },
            {
              "name": "Standard Metro"
            },
            {
              "name": "Express Metro"
            },
            {
              "name": "Standard Rural"
            }
          ]
        }
      }
    }
  }
}
Here you can see that all 4 shipping rules could be applicable to this product (again the size or profile of this product isn’t really filtering out anything). It would then be for the operator to:
- Determine the applicable zone (based on the customers delivery address)
- E.g. this would filter down options to say: Standard Metro and Express Metro
- The customer could then determine if they wanted standard or express shipping
For more detail on how shipping rules can be consumed by the operator at the point of checkout you can refer to the operator guide for shipping rules here.