HubSpot Example
What you’ll learn
In this guide you’ll learn:
- How to configure webhooks in Marketplacer
- How to consume those webhooks to perform subsequent operations
- How to attach ExternalIds to Marketplacer objects
🎥 Note: A companion video for this playbook is available where we step through the major solution components and run a demo.
Scenario
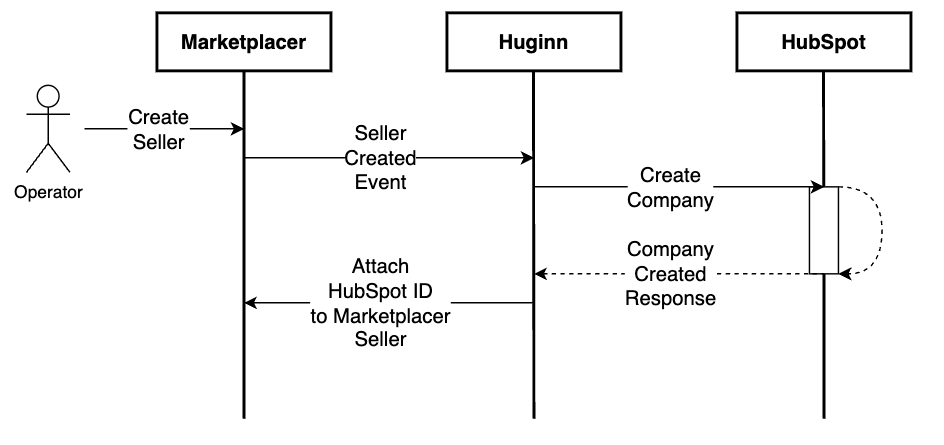
Today’s scenario illustrates a real-world example on how you can use webhooks to automate downstream operations. We’ll describe it as follows:
As a marketplace operator
I want to create a Seller in Marketplacer
And have an associated Company automatically created in my HubSpot CRM
And have the 2 entities associated with each other
So that I can more effectively manage and service that Seller
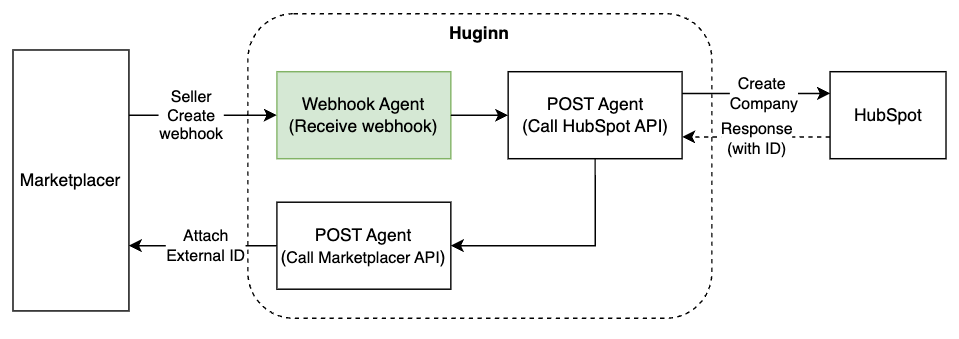
This scenario is represented by the following flows of data:
Solution Components
Taking the core interactions illustrated in the last section, we can now map these to the solution components we’re going to use in this build.
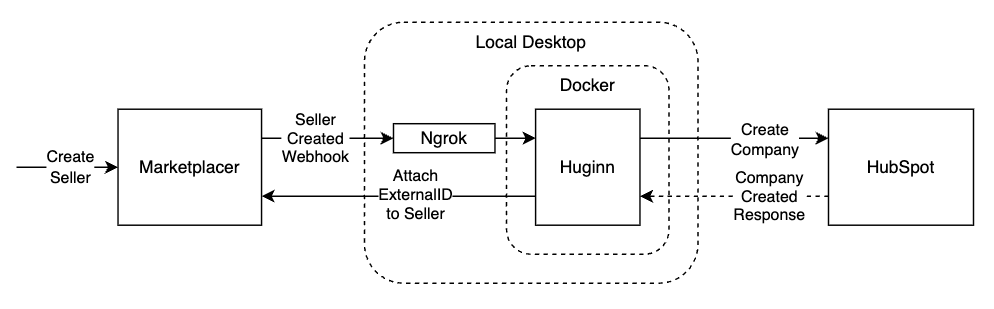
Each of the illustrated solution components are described in more detail below:
Marketplacer
Marketplacer hosts products from multiple sellers that will be surfaced and sold on the eCommerce frontend. In this scenario we are going to:
- Configure a Seller Create webhook - this will fire any time a new seller is created in Marketplacer
- Call the Marketplacer Operator API externalIdUpsert mutation to attach the associated HubSpot ID to the Marketplacer Seller
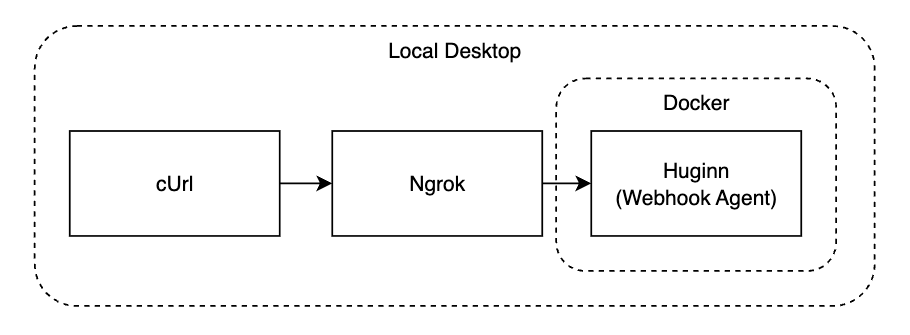
Local desktop
Aside from Marketplacer and HubSpot which are hosted SaaS offerings, the remaining solution components will be hosted on a local desktop - this is primarily for reasons of simplicity. Our desktop will host:
Running in Production
In a production scenario you would of course not be running components on a local desktop. Furthermore, you may choose something other than Huginn to act as the integration layer between Marketplacer and HubSpot.
We have chosen these options for this guide as they provide a low-friction path to allow us to discuss the core integration concepts involved which is the main aim of this article.
Ngrok
Ngrok is a tool that allows you to expose an internet accessible URL to other applications, Ngrok can then forward any HTTP traffic hitting that URL to a localhost endpoint. The reason we require Ngrok today is that you cannot configure Marketplacer webhooks to target localhost endpoints directly (in this case our instance of Huginn running in Docker), so we need some other mechanism to route this traffic.
Ngrok would not typically be required in production environments, or any environment where we could expose Huginn directly to the internet.
Docker
Docker is a platform that allows you to select from thousands of pre-packaged images and run them as containers. Images are pre-configured application templates e.g. Huginn, PostreSQL, Redis etc.
The reason we are using Docker today is that it allows us to quickly and easily spin up an instance of Huginn that would otherwise be much more difficult to set up and run natively on an OS.
Huginn
Huginn, (pronounced: hoo-gin), is an open source workflow automation tool that allows you to create agents to perform discrete items of work. Agents can accept and generate events (although this depends on the type of agent you are working with). You can then chain agents together to create scenarios. In our example we will work with 3 agents of 2 different types:
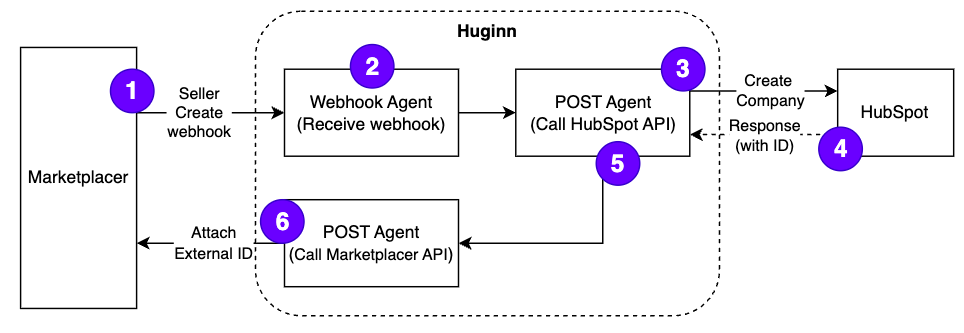
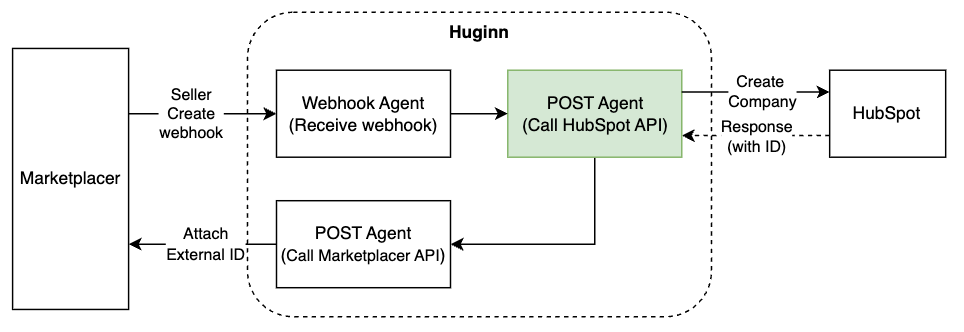
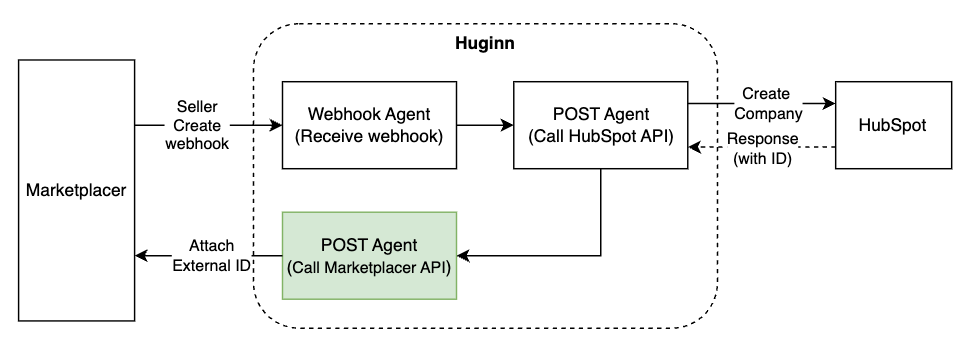
The steps identified above are:
- We create a Seller in Marketplacer and emit a Seller Created Webhook which is sent to:
- A Huginn Webhook Agent. This agent receives the payload (via Ngrok - not shown) and passes it to:
- A Huginn POST Agent. Using the data from the Webhook Agent, this agent is responsible for calling the HubSpot REST API to create a new Company
- Upon creation of a new Company in HubSpot, the HubSpot API responds with (amongst other things) the HubSpot Company ID
- The Huginn POST agent then emits an event with the results of the HubSpot API call to:
- A 2nd Huginn POST agent. Using the data from the 1st POST Agent, this agent is responsible for forming a GraphQL API call to the Marketplacer Operator API to attach an external ID to the Seller.
HubSpot
HubSpot is a cloud-based CRM (Customer Relationship Management) solution designed to help businesses manage contacts, sales, leads and other interactions. In today’s scenario we are going to create a Company entity in HubSport, which in the context of running a marketplace is analogous to a Seller (on the marketplace).
You may wish to model a seller on your marketplace as something other than a company in HubSpot (e.g. a “Contact”), but for the purposes of this guide it’s not that important.
Solution Set Up
So that we have the relevant dependencies in place, we’ll set up our systems in the following order:
- HubSpot
- Docker
- Huginn - Part 1
- Ngrok
- Marketplacer Webhook
- Huginn - Part 2
HubSpot
The steps here assume you already have a HubSpot account.
Create a HubSpot private app
In this section we’re going to set up the app that will allow us to create Companies via the HubSpot REST API.
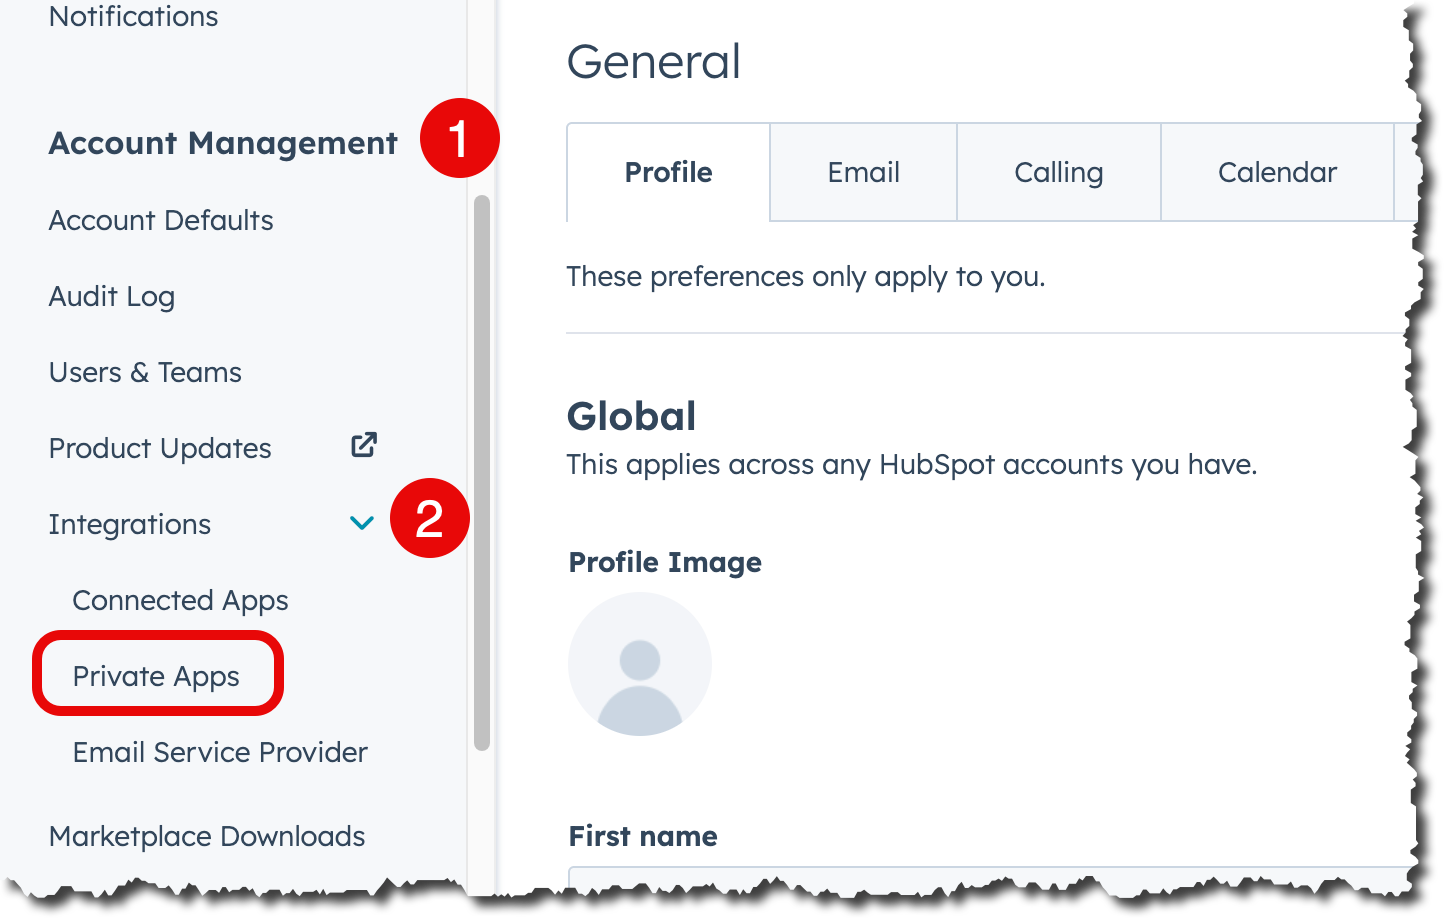
- Login to your HubSpot account and select Settings:

- Select: Account Management -> Integrations -> Private Apps
- Select Create a private app
- In the Basic Info tab, give your app a name and a description
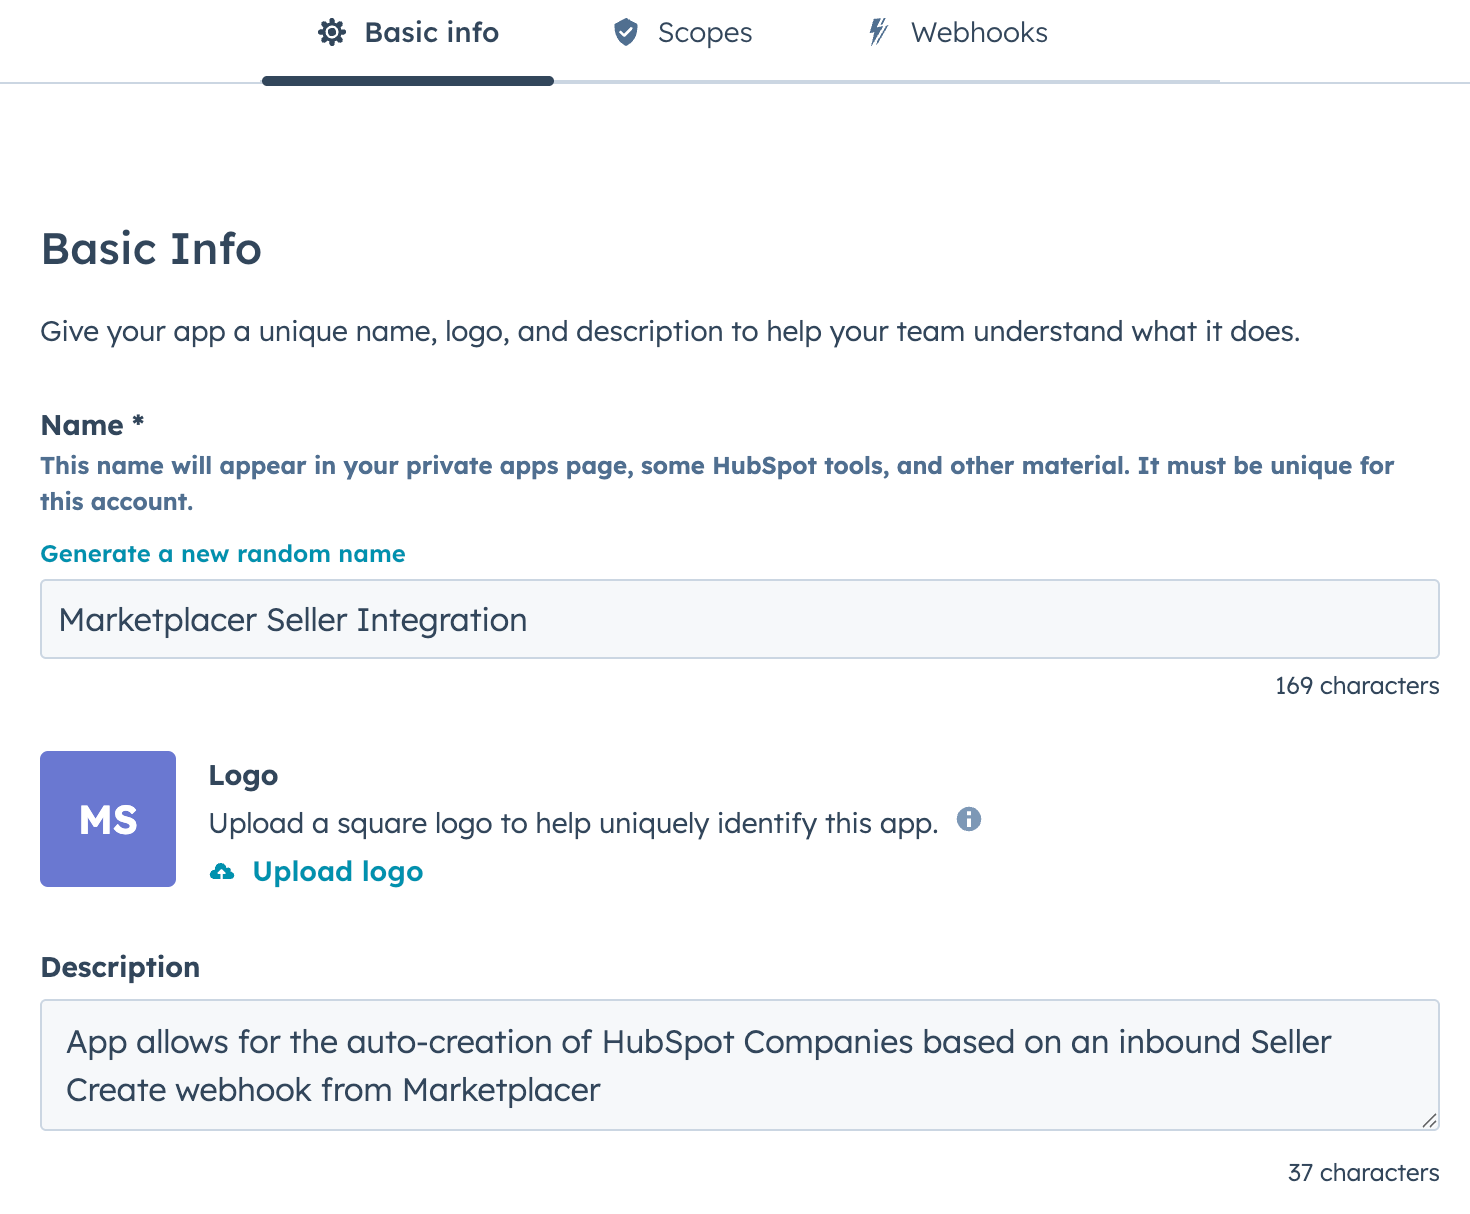
- Moving to the Scopes tab, select Add new scope
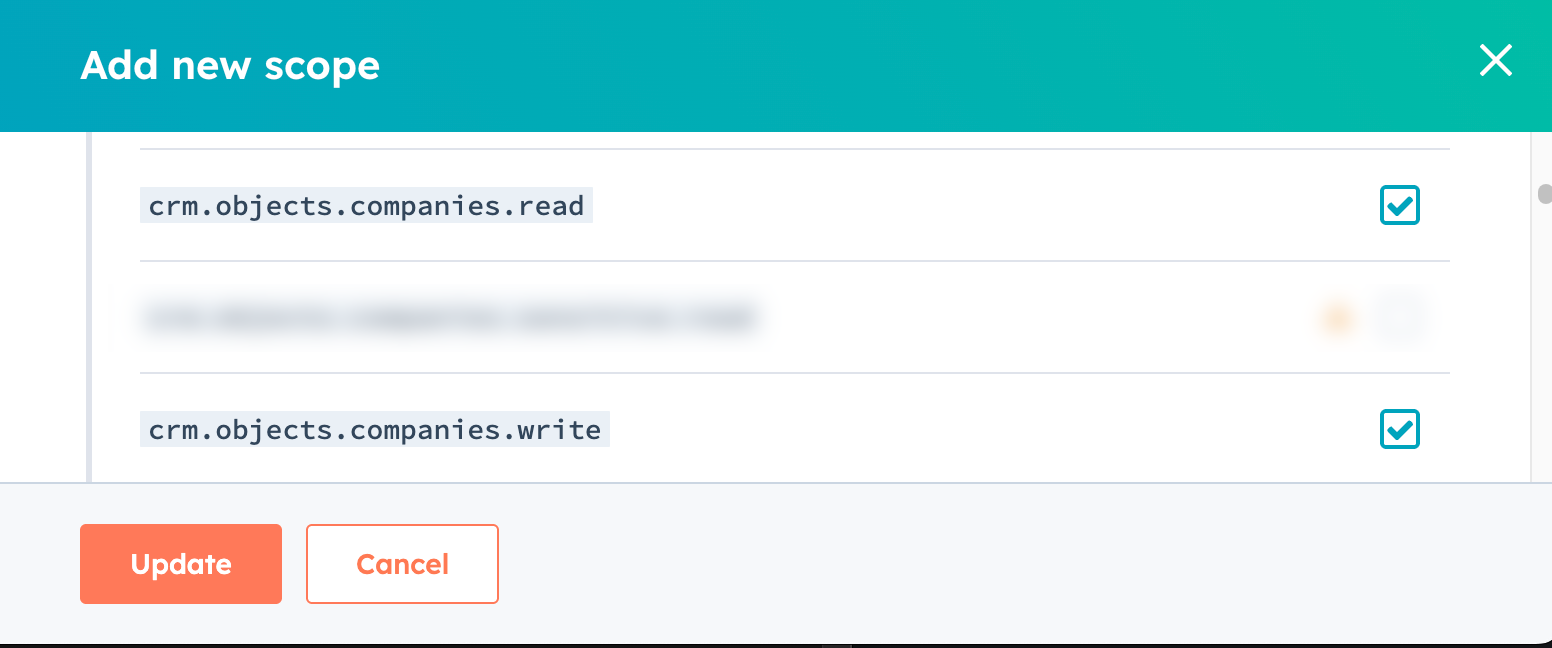
- Select the following scopes and click Update when done:
crm.objects.companies.readcrm.objects.companies.write
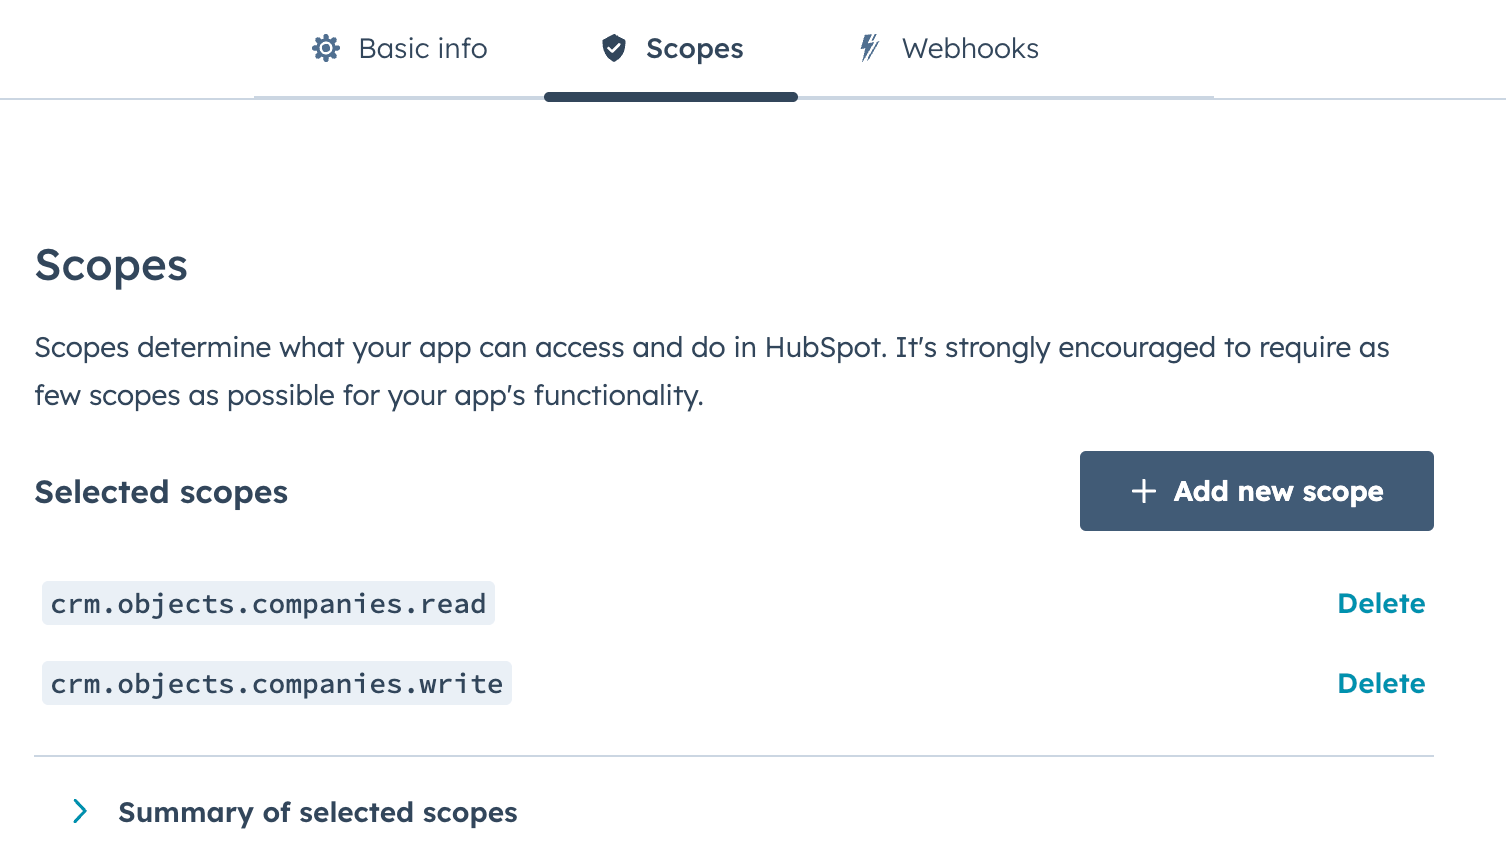
- Check that the following scopes have been selected:
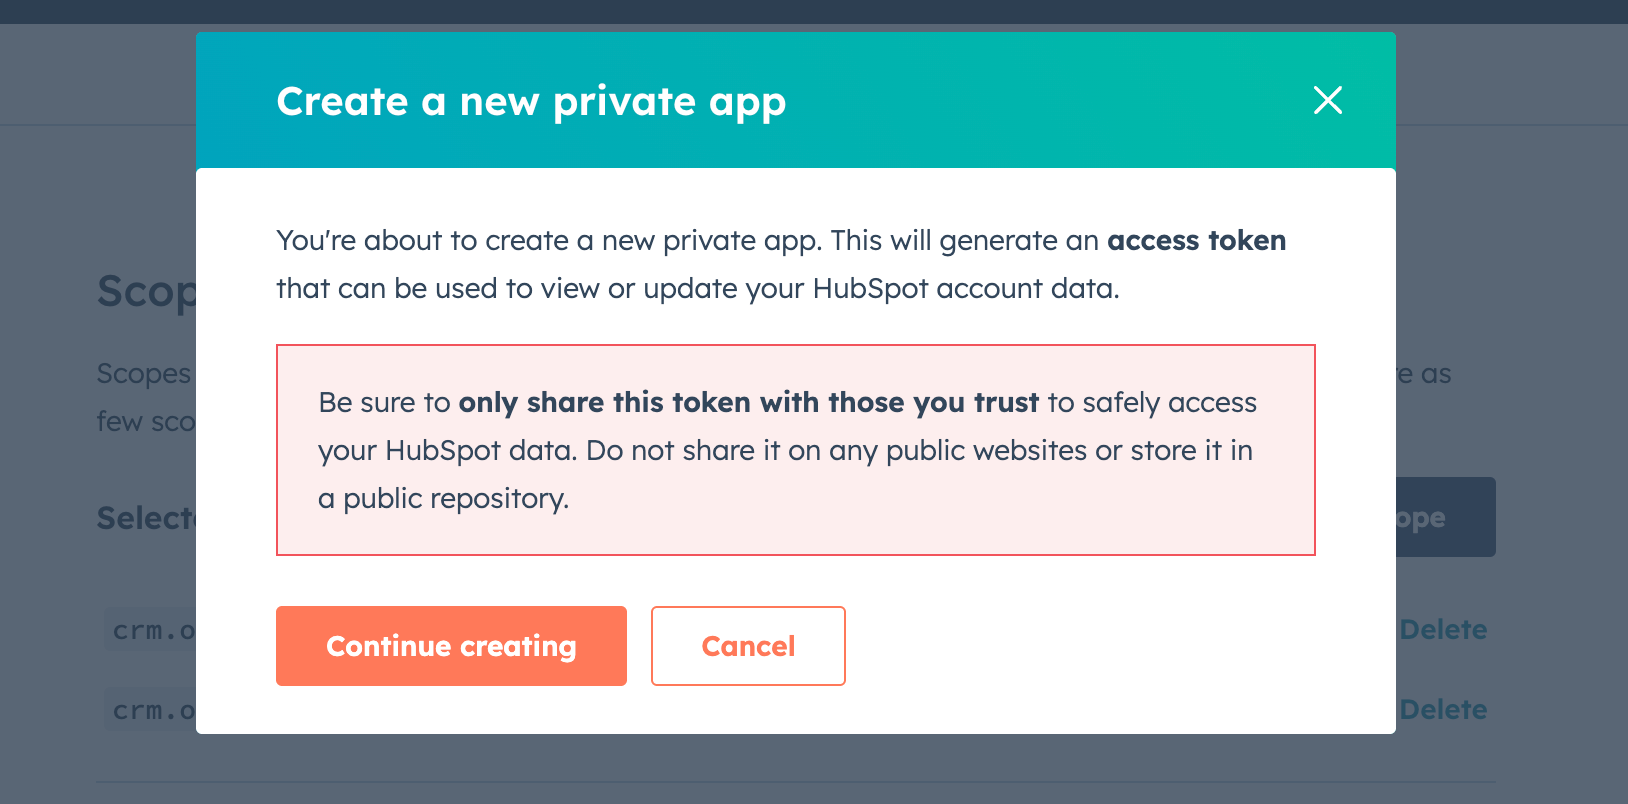
- Select Create App, and you should receive this warning, if you’re happy, select Continue creating:
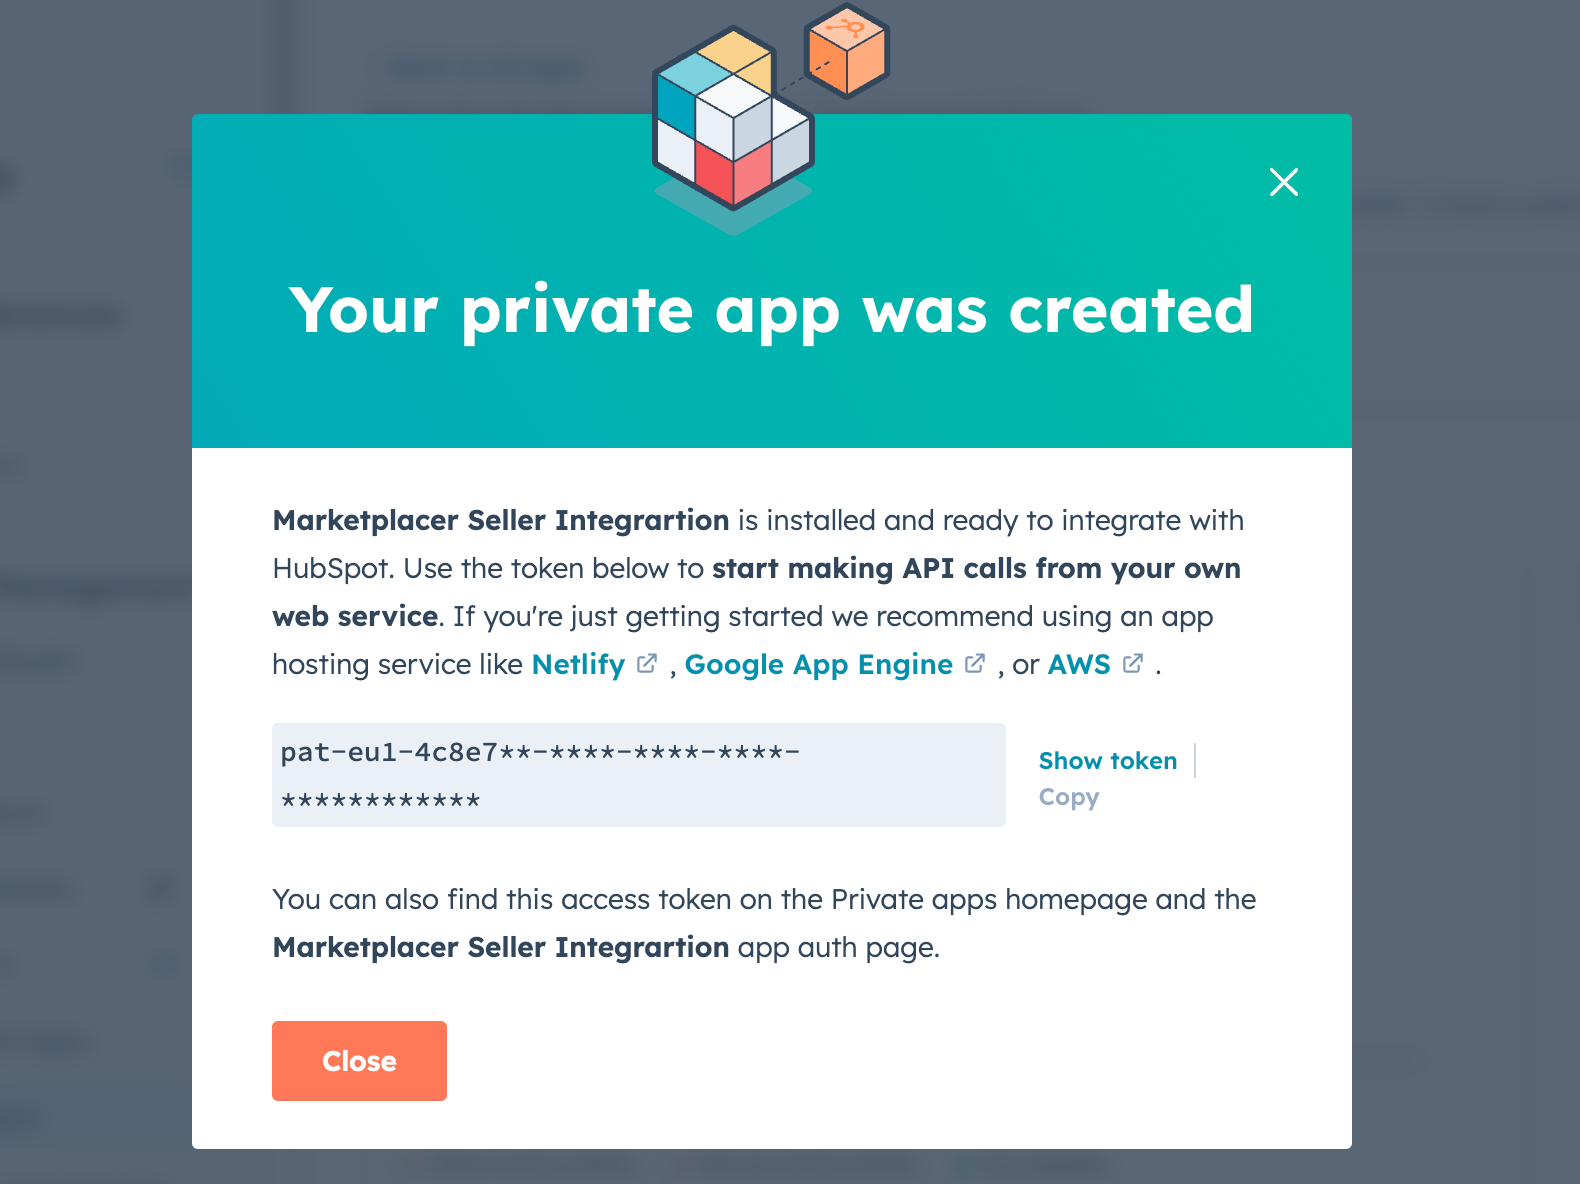
- You will receive notification that the app was successfully created, make sure that you copy the token provided as we’ll be using that later. Then click Close.
Testing that the app works
At this point we can now test that our HubSpot app is working. You can use any tool you like to do this (Postman, Insomnia etc.) so long as it can generate HTTP POST requests with a JSON body.
We’ll use the command line tool cUrl to do this (you may need to install this if it’s not available on your system). An example of the request we’ll send is shown below, note that you’ll need to insert the token that was generated when we set up the app in HubSpot:
curl -XPOST -H 'authorization: Bearer <INSERT YOUR TOKEN>' -H "Content-type: application/json" -d '{
  "properties": {
    "name": "Acme Corporation",
    "domain": "acme.com",
    "industry": "RETAIL",
    "phone": "555-123-4567"
  }
}' 'https://api.hubapi.com/crm/v3/objects/companies'
This makes a POST request to our app at the following endpoint:
https://api.hubapi.com/crm/v3/objects/companies
using the following body payload:
{
  "properties": {
    "name": "Acme Corporation",
    "domain": "acme.com",
    "industry": "RETAIL",
    "phone": "555-123-4567"
  }
}
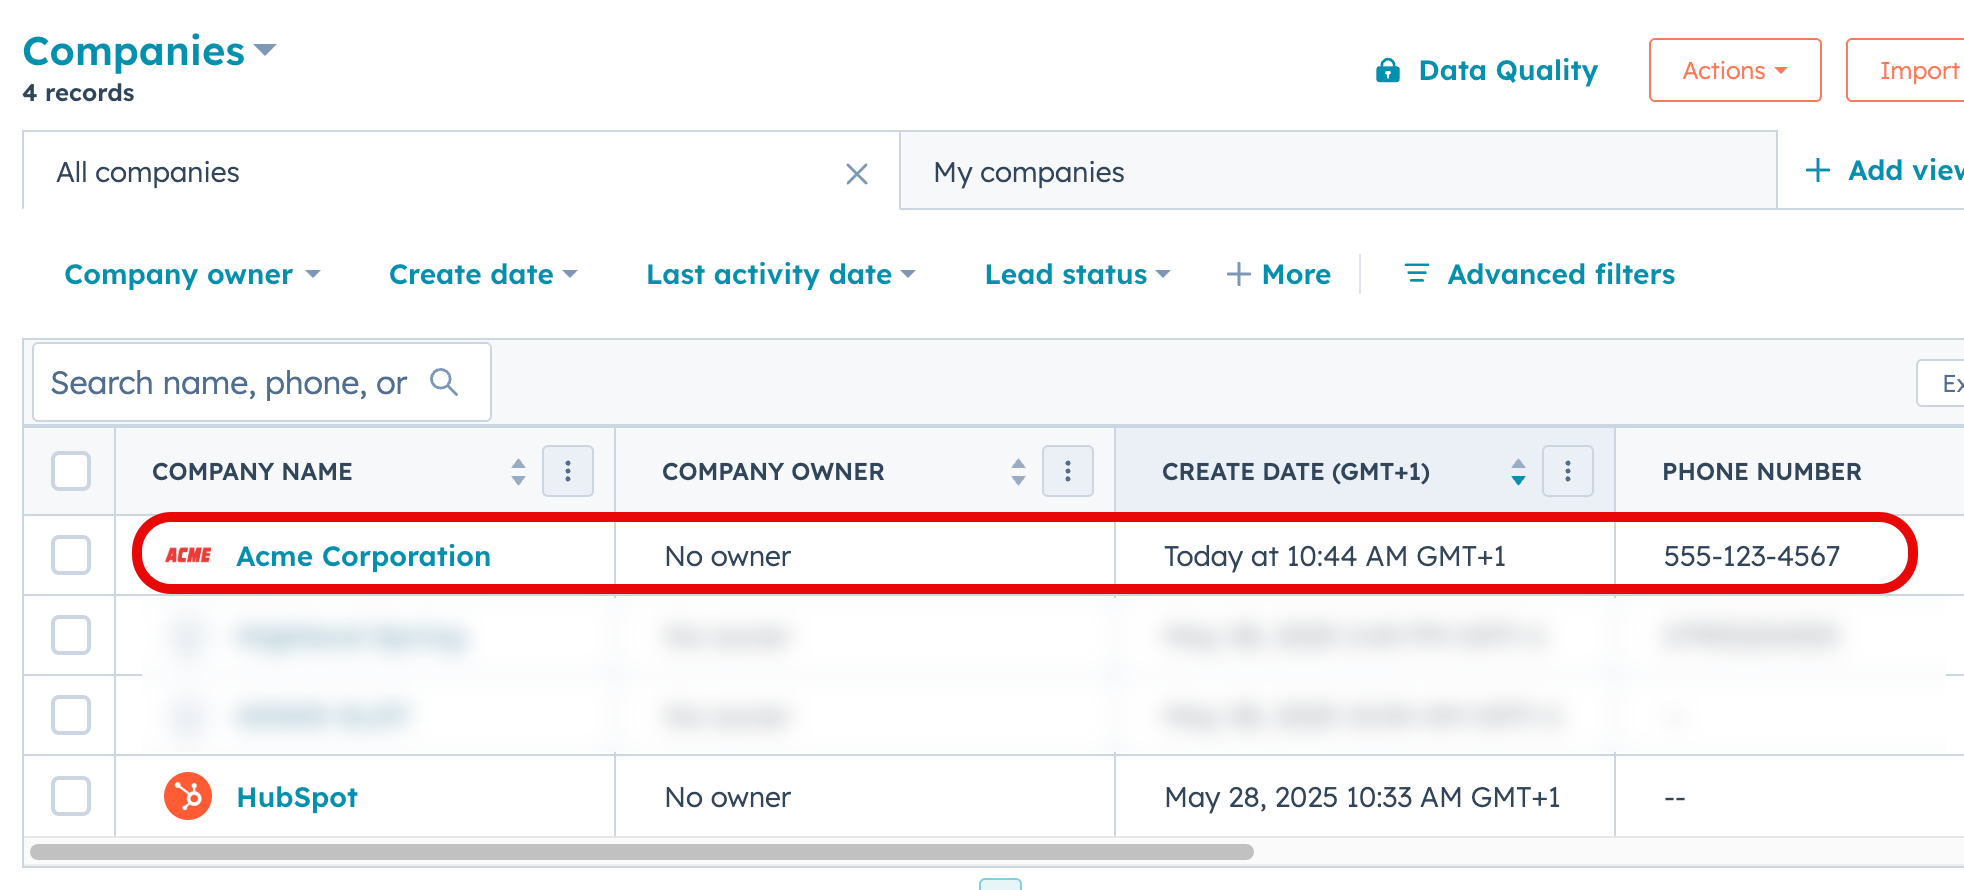
If successful, you should receive a JSON payload response in the console, and navigating to Companies in HubSpot (CRM -> Companies) should reveal the company was created:
We’re finished with our HubSpot App for the moment, but in a later section we’ll be configuring a Huginn agent to make this call.
Docker
Install Docker Desktop
First install Docker Desktop for your chosen desktop OS. We’ll not provide set up instructions here as the team at Docker have already done a great job of that.
Test Docker is running
Once you have installed Docker Desktop, check that it is running by typing the following at a command prompt:
docker ps
You should see something like this:
CONTAINER ID IMAGE COMMAND CREATED STATUS PORTS NAMES
Note: this command just asked Docker to list any running containers (apps), at this point you should not have any, but you should still get a non-error based response.
If this returns with an error response, then you’ve either:
- Not installed Docker Desktop
- Docker Desktop is not running
Important: If you experience an error here, you will need to remediate it before moving on.
Huginn - part 1
Running Huginn in Docker
As already mentioned we’re going to use Docker to host and run Huginn, specifically we are going to create a docker-compose file to contain the necessary config to get us up and running.
With this in mind, using your favorite text editor, (or if you don’t have a favorite - we’d suggest VS Code) create a new file called: docker-compose.yml and populate it as follows:
services:
  huginn:
    image: ghcr.io/huginn/huginn:latest
    restart: always
    ports:
      - "3000:3000"
This file simply tells Docker:
- Which image to use as a template in order to create a running (container) instance of Huginn.
- Whether the container should restart on failure
- The local to internal port assignment of the container
Save the file in a suitable location, and at a command prompt at that location type:
docker compose up -d
Docker will then use the contents of the docker-compose.yml file to spin up an instance of Huginn.
Note: If this is the first time you are doing this, Docker will download the image from a remote image repository which depending on your network connection may take up to a few minutes.
Assuming everything is successful you should see something similar to the following:
lesjackson@Less-MacBook-Pro-6 webhook_receiver % docker compose up -d
[+] Running 1/1
 ✔ Container webhook_receiver-huginn-1  Running                            0.0s
Configuring Huginn
At a web browser on the same machine as Docker Desktop, navigate to: http://localhost:3000/
Note: You may need to wait a few minutes for Huginn to start up for the first time, so if you get a: This site can’t be reached, or something similar - just wait a few more minutes then try again.
Login with the following credentials:
- Username: admin
- Password: password
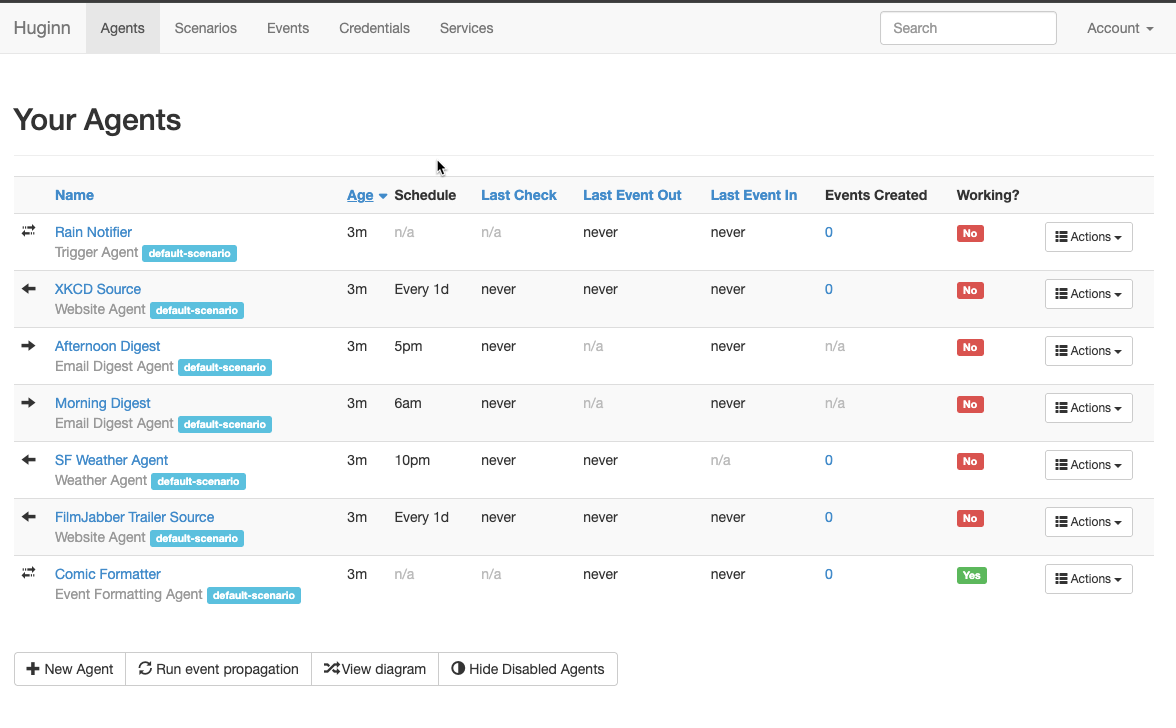
After logging in, select Agents from the top menu to reveal that we have some pre-configured agents - don’t get too attached as we are going to delete them:
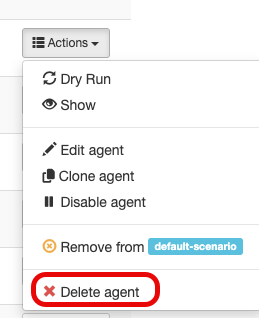
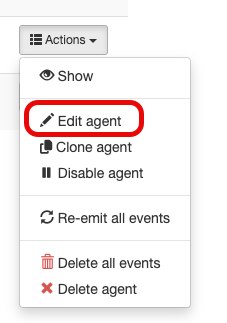
So that we can start from a clean slate, for each agent select Delete agent from the Actions menu as shown below:
Webhook agent 1
We’re going to create the first of our 3 Huginn agents, that being Webhook agent #1. This agent is responsible for receiving the webhook from Marketplacer (passed to it via Ngrok), and cascading it to the POST Agent.
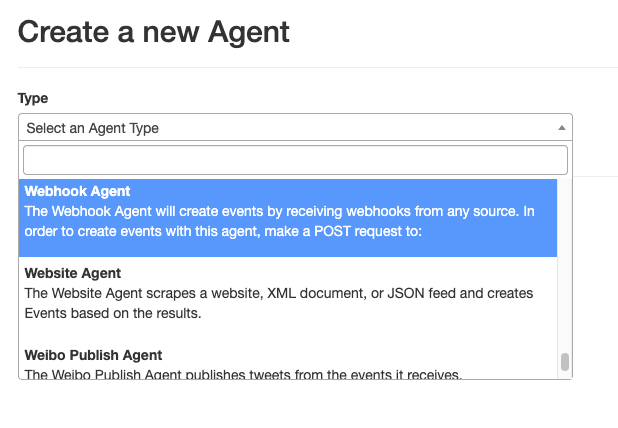
In the Agents menu, select New Agent, then select Webhook Agent from the list as shown below:
All you need to do here is give the agent a name, e.g.: Receive Seller Create Webhook then click Save.
In order get the full URL that we can target this endpoint with, we need to open it again by selecting Edit agent from the Actions menu as shown below:
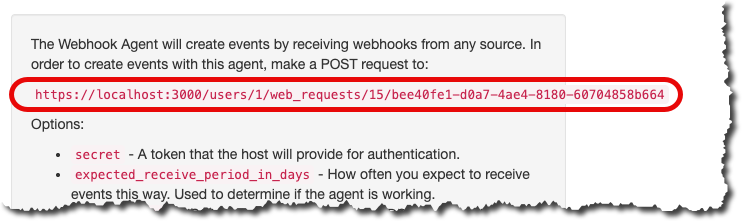
Here you will see the generated URL that we can use for this agent:
To test that this is working (and receiving traffic) we can make a direct call to the endpoint again using something like Postman, Insomnia, or in our case cUrl:
curl -X POST -H 'Content-type: application/json' --data '{"text":"hello"}' http://localhost:3000/users/1/web_requests/15/bee40fe1-d0a7-4ae4-8180-60704858b664
You should get a response similar to the following:
Event Created
Looking at the agent list in the Huginn admin portal you should see that this was successful:

Make a note of this URL as we’ll be using (part of) this when we come to configure the webhook in Marketplacer.
We’ll step away from Huginn for the moment, as in order to make sense of creating the remaining 2 agents, we need to work with a “real” webhook payload that is emitted from Marketplacer. Therefore, we need to move on to setting up Ngrok and the webhook in Marketplacer.
Ngrok
Security considerations
The whole point of using Ngrok today is to provide a publicly accessible URL that we can send traffic to. By enabling that type of functionality, we increase the attack surface for bad actors.
With this in mind, you will need to undertake your own assessment as to whether the use of Ngrok is right for you, or indeed if you are working on behalf of an organization, whether its use is permitted at all.
As with Docker, we won’t detail the full install and set up instructions for Ngrok as that is maintained and kept up to date here.
Static Vs Dynamic URLs
By default, when you start Ngrok it will generate a dynamic URL and expose that to the internet for use by your clients. Dynamic in this context means that if you stop Ngrok and restart it, the next URL you get will have changed. This clearly poses an issue when configuring clients that are using Ngrok (in this case that would be Marketplacer) as you would need to change the target URL in the client every time Ngrok restarts.
At the time of writing, Ngrok allowed users of their free offering to claim a static URL, meaning that the Ngrok URL presented won’t change upon restart. We suggest if this option is still available, then you opt in to this.
Having installed Ngrok, we simply want to start it and point it at our instance of Huginn, we do that by issuing the command below:
ngrok http --domain="my-static-domain.ngrok-free.app" http://localhost:3000
Here we are:
- Specifying that we want to use a static
domain- If you don’t provide this, then you will be issued with a dynamic URL - see call-out above.
- Directing traffic to:
http://localhost:3000- Note: that we only provide the host name and port (not any further parts of any routes)
If started successfully you should see something similar to the following:
Session Status                online
Account                       Les Jackson (Plan: Free)
Version                       3.22.1
Region                        Europe (eu)
Web Interface                 http://127.0.0.1:4040
Forwarding                    https://my-static-domain.ngrok-free.app -> http://localhost:3000

Connections                   ttl     opn     rt1     rt5     p50     p90
                              0       0       0.00    0.00    0.00    0.00
We can now test sending traffic to Ngrok to see whether it propagates through to our Huginn webhook agent:
The URL we need to provide to cUrl (and subsequently used when configuring the Marketplacer webhook) is comprised of 2 parts:
- The public hostname provided by Ngrok,
- e.g.:
https://my-static-domain.ngrok-free.app
- e.g.:
- The route to the Huginn Webhook agent,
- e.g.:
/users/1/web_requests/15/bee40fe1-d0a7-4ae4-8180-60704858b664
- e.g.:
So in our example the full URL would be:
https://my-static-domain.ngrok-free.app/users/1/web_requests/15/bee40fe1-d0a7-4ae4-8180-60704858b664
Plug this into cUrl (or whatever tool you are using) and make a POST request to it:
curl -X POST -H 'Content-type: application/json' --data '{"text":"hello"}' https://my-static-domain.ngrok-free.app/users/1/web_requests/15/bee40fe1-d0a7-4ae4-8180-60704858b664
You should get a response similar to the following:
Event Created
Retain this URL as we’ll be using next when we configure the webhook in Marketplacer
Assuming everything has worked as expected, we can now say that:
- Ngrok has been configured to send traffic from its publicly exposed endpoint to Huginn
- The Huginn Webhook Agent is working
Marketplacer webhook
We now want to set up a webhook in Marketplacer that will trigger when a seller is created. As the creation of Sellers is exclusively the remit of the Operator (and not the Seller), we’ll focus on creating the webhook in the operator portal.
This article fully covers how to create a webhook in Marketplacer so we won’t repeat all those steps in detail here. Instead, we’ll just provide the values that you need to supply when creating your webhook.
- Webhook type: Seller
- Event name: Create
- URL: https://my-static-domain.ngrok-free.app/users/1/web_requests/15/bee40fe1-d0a7-4ae4-8180-60704858b664
- Note: Provided as an example only - substitute for your own url
- Enabled: True
- GraphQL: see below
query ($id: ID!) {
  node(id: $id) {
    ... on Seller {
      __typename
      id
      businessName
      trade
      phone
      emailAddress
      metadata {
        key
        value
      }
      tags
      externalIds {
        key
        value
      }
    }
  }
}
The GraphQL query describes what attributes we want to send with the webhook, in this case we are really in the businessName as we’ll use that to create the company in HubSpot. We may use 1 or 2 of the others as well, but we’ll keep it pretty minimal for this exercise.
Creating a seller
Having created our webhook (make sure it’s enabled!) we can test it by creating a seller.
The easiest way to do this is by creating one using the Operator Portal (you could use the API as well of course), by following the steps below.
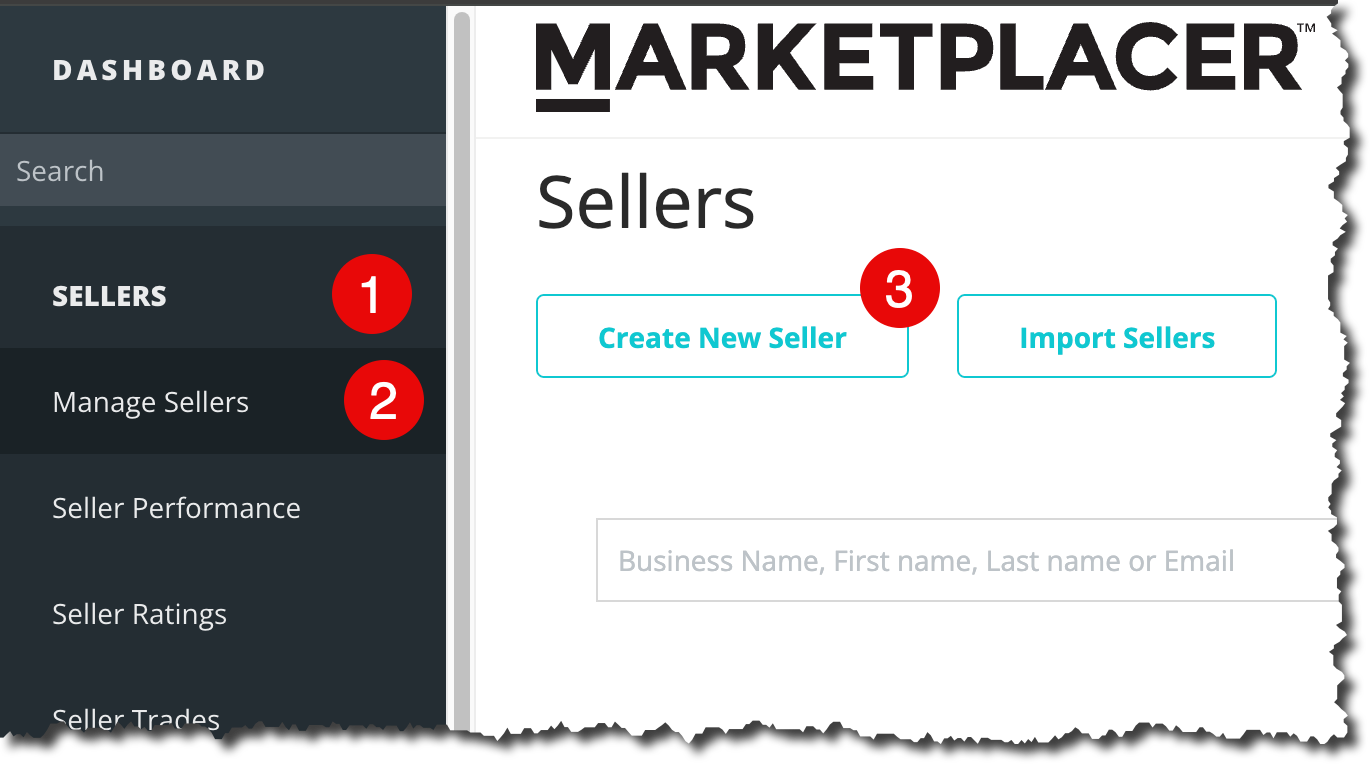
- Login to the Operator Portal
- Expand Sellers then select Manage Sellers and click Create New Seller
The fill out the following mandatory details:
- Business Name
- Legal Business Name
- First Name
- Last Name
- User’s Email Address
- Address
- Phone (this is optional, but we can use it in our call to HubSpot)
- Account Type (set to Retailer)
When you’re happy, click Create New Account, you should see that the new Seller has been created successfully:

Checking the webhook
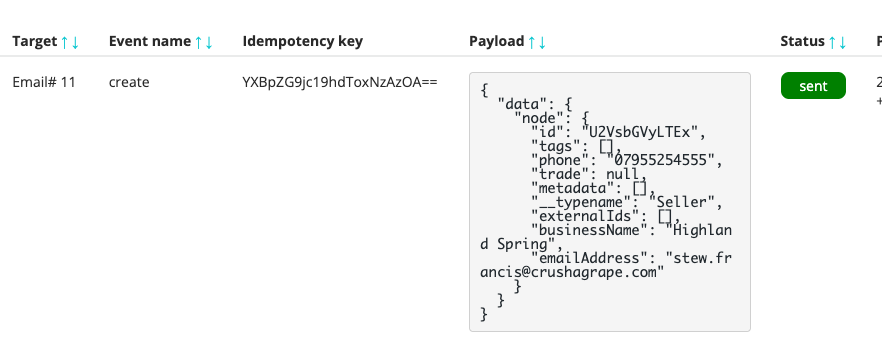
We now want to ensure that Marketplacer emitted a webhook event. To do so, go to where you created the webhook in the Operator portal and check for the events on the webhook by selecting the “+” sign next to the webhook
In the following example using the Operator Portal we can see that a Seller Create event was emitted successfully:
We should also see an entry on the Ngrok Console representing the request:
Session Status                online
Account                       Les Jackson (Plan: Free)
Version                       3.22.1
Region                        Europe (eu)
Latency                       23ms
Web Interface                 http://127.0.0.1:4040
Forwarding                    https://my-static-domain.ngrok-free.app  -> http://localhost:3000

Connections                   ttl     opn     rt1     rt5     p50     p90
                              1       0       0.00    0.00    0.03    0.03
HTTP Requests
-------------
15:05:01.096 BST POST /users/1/web_requests/10/bee40fe1-d0a7-4ae4-8180-60704858b664 201 Created
And finally we can look at the Webhook Agent in Huginn to see the events it has emitted (the emitted event should match what it has received by way of inputs). You can do this by:
- Selecting Agents from the main Huginn Portal menu
- Clicking the Events Created number for the Webhook agent
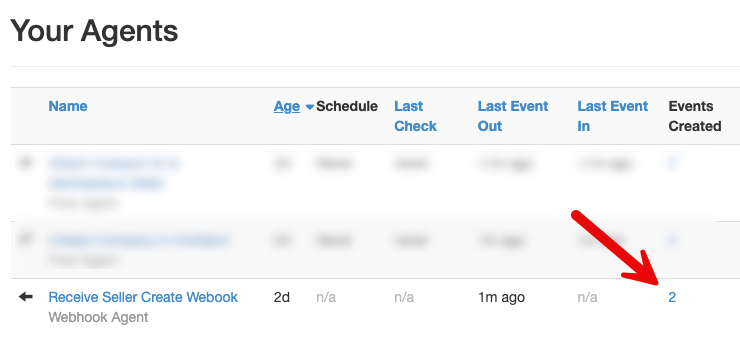
- Select Show Event for the emitted event:

And you can see the emitted event payload:
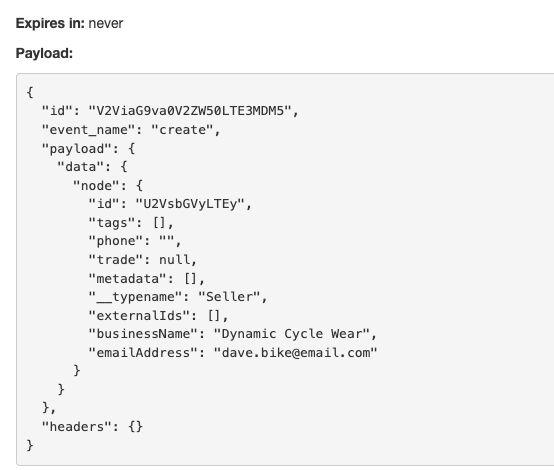
We will refer back to this payload when we configure the next agent in Huginn, as it will be reliant upon the payload structure and the values it provides.
Huginn - part 2
We have 2 agents left to create:
- POST Agent # 1 - Create company in HubSpot
- POST Agent # 2 - Attach HubSpot ID to Marketplacer Seller
POST Agent #1
In this step we are going to creat the 1st POST agent:
This agent:
- Takes the event input from the Webhook agent
- Calls the HubSpot API
- Passed the result to the 2nd POST agent
We’ll create it as follows:
- In the Huginn management portal, select Agents -> New Agent
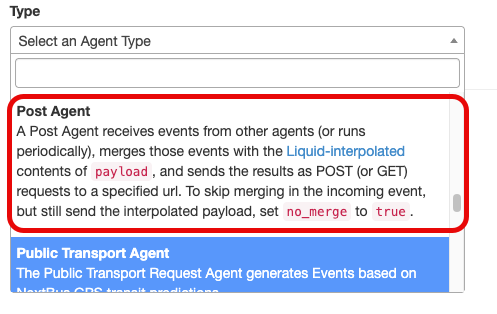
- Select Post Agent from the list of available agents
- Name the agent, e.g.: Create Company in HubSpot
- Select the Webhook Agent you created earlier as a source:

We’re going to configure the Options by manipulating the underlying JSON, to do so select Toggle View to display the JSON editor, then paste in the following config:
{
  "post_url": "https://api.hubapi.com/crm/v3/objects/companies",
  "expected_receive_period_in_days": "1",
  "content_type": "json",
  "method": "post",
  "payload": {
    "properties": {
      "name": "{{payload.data.node.businessName}}",
      "domain": "test3.com",
      "industry": "RETAIL",
      "phone": "{{payload.data.node.phone}}"
    }
  },
  "headers": {
    "authorization": "Bearer <YOUR TOKEN HERE>"
  },
  "emit_events": "true",
  "parse_body": "true",
  "no_merge": "true",
  "output_mode": "merge"
}
You’ll see how this config reflects the information required of the HubSpot API. The fields of note are:
| Field | Description |
|---|---|
post_url | HubSpot companies endpoint - used to create a company |
method | Set to post |
payload | This contains the nested JSON the HubSpot API expects |
payload.properties.name | This is the businessName from the Marketplacer webhook. You can see that we navigate through the webhook payload to get to this value |
payload.properties.domain | Hard coded website for the company |
payload.properties.industry | Hard coded industry segment |
payload.properties.phone | We are pulling this value dynamically from the Marketplacer webhook |
headers.authorizarion | This is where you need to configure the Bearer Token for the HubSpot app |
emit_events | Set to true as we want this agent to trigger our final (3rd agent) |
output_mode | Set to merge, this means we combine and retain the triggering payload and any new event payloads. Our 3rd Agent will be reliant upon info from both payloads (I.e. the Marketplacer webhook and the HubSpot API response) |
Click save when done.
Testing
We can test what we have done so far by creating another user in Marketplacer, this is a useful exercise as it will:
- Prove what we have done to date works
- Provide us with an example emitted payload - we’ll need this for the final agent.
Repeat the steps to create another new seller using the Operator Portal (not shown - refer to the section above if you can remember)
Having done so check to see that this agent emitted an event, do this in the Huginn Management Portal and select Agents and you should see that you have a newly emitted event for this agent (be patient as this may take a few minutes to propagate):
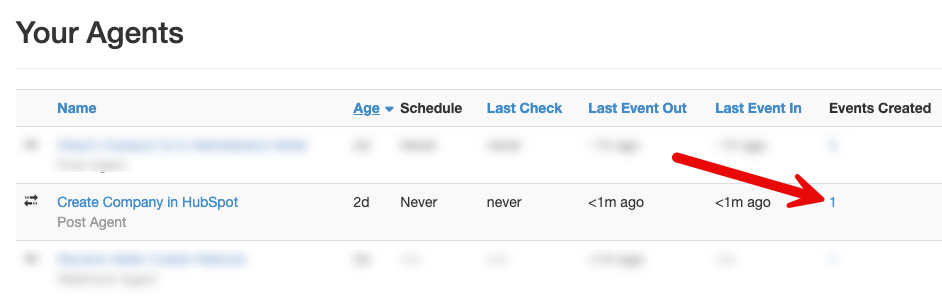
Click on this number and show the payload, you should see something similar to this (some redundant detail has been removed):
{
  "id": "V2ViaG9va0V2ZW50LTE3MDQw",
  "event_name": "create",
  "payload": {
    "data": {
      "node": {
        "id": "U2VsbGVyLTEz",
        "tags": [],
        "phone": "",
        "trade": null,
        "metadata": [],
        "__typename": "Seller",
        "externalIds": [],
        "businessName": "Standard Equipment",
        "emailAddress": "dave.book@email.com"
      }
    }
  },
  "headers": {
    "Date": "Fri, 30 May 2025 14:14:09 GMT",
    "Content-Type": "application/json;charset=utf-8",
    "Content-Length": 795,
    "Location": "https://api.hubapi.com/crm/v3/objects/companies/163772320956",
  },
  "body": {
    "id": "163772320956",
    "properties": {
      "createdate": "2025-05-30T14:14:09.432Z",
      "domain": "test3.com",
      "hs_annual_revenue_currency_code": "USD",
      "hs_lastmodifieddate": "2025-05-30T14:14:09.432Z",
      "hs_num_blockers": "0",
      "hs_num_child_companies": "0",
      "hs_num_contacts_with_buying_roles": "0",
      "hs_num_decision_makers": "0",
      "hs_num_open_deals": "0",
      "hs_object_id": "163772320956",
      "hs_object_source": "INTEGRATION",
      "hs_object_source_id": "13368886",
      "hs_object_source_label": "INTEGRATION",
      "hs_pipeline": "companies-lifecycle-pipeline",
      "hs_task_label": "Standard Equipment",
      "industry": "RETAIL",
      "lifecyclestage": "lead",
      "name": "Standard Equipment",
      "num_associated_contacts": "0",
      "num_notes": "0",
      "phone": null,
      "website": "test3.com"
    },
    "createdAt": "2025-05-30T14:14:09.432Z",
    "updatedAt": "2025-05-30T14:14:09.432Z",
    "archived": false
  },
  "status": 201
}
You can see that we have retained the original Marketplacer webhook payload, and have merged the response from the HubSpot API. Our final agent will be interested in just 2 pieces of information:
payload.data.node.id: This is the Marketplacer Seller Idbody.id: This is the HubSpot company object Id
POST Agent #2
The final agent is used to call the Marketplacer GraphQL API and attach an external Id to the Seller object, thus ensuring we have a link between the Marketplacer Seller and the HubSpot Company entities.
We’ll create it as follows:
- In the Huginn management portal, select Agents -> New Agent
- Select Post Agent from the list of available agents
- Name the agent, e.g.: Attach HubSpot Id to Marketplace Seller
- Select the Post Agent you created in the last step as a source:

As before, we’re going to configure the Options by manipulating the underlying JSON, to do so select Toggle View to display the JSON editor, then paste in the following config:
{
  "post_url": "https://<your-instance>.marketplacer.com/graphql",
  "expected_receive_period_in_days": "1",
  "content_type": "json",
  "method": "post",
  "payload": {
    "query": "mutation AddHubspotIdToSeller($input: ExternalIDUpsertMutationInput!){  externalIdUpsert(input: $input  ) {status errors {field messages} externalId {key      value owner {... on Seller {id legacyId updatedAt externalIds {key value}}}}}}",
    "operationName": "AddHubspotIdToSeller",
    "variables": {
      "input": {
        "owner": "{{payload.data.node.id}}",
        "key": "HubSpotId",
        "value": "{{body.id}}"
      }
    }
  },
  "headers": {
    "marketplacer-api-key": "<YOUR OPERATOR API KEY HERE>"
  },
  "emit_events": "true",
  "parse_body": "true",
  "no_merge": "true",
  "output_mode": "clean"
}
This configuration reflects the config you’ll need to pass to the Marketplacer Operator API to call the externalIdUpsert mutation. Fields of note are described below:
| Field | Description |
|---|---|
post_url | The GraphQL API endpoint, be sure to replace <your-endpoint> to something that resolves to your Marketplacer instance. |
method | Set to post |
payload.query | This contains the mutation definition for externalIdUpsert. You can read more about this mutation here |
payload.operationName | This is the name we have given our mutation definition - see payload.query. For more information on naming GraphQL operations, refer to our Best Practices Guide |
payload.variables | These are the values that the externalIdUpsert mutation requires. |
payload.variables.input.owner | This is the Marketplacer object Id we want to attach an External Id to, in this case it’s the Seller Id retrieved from the webhook payload |
payload.variables.input.key | External Ids require a key and a value in this case we just hard code the key |
payload.variables.input.value | This is the actual value of the External Id, in this case we are populating it from the response we received from the HubSpot API. |
headers.marketplacer-api-key | You’ll need to provide a valid Operator API key - more information on how to generate a key can be found here. |
emit_events | While we don’t have any further down-stream agents, we are still going to emit an event in order that we can easily observe the response we get back from the Marketplacer API. |
output_mode | We set this to clean as at this point we’re only interested in the response from the Marketplacer API, and do not need to retain the prior agent event outputs |
Testing
Again we can test this has worked by creating another seller Markertplacer and waiting for the events to percolate through the system.
As before you can look at the emitted event payload from the final agent by following the steps we have performed before. A successful response from the Marketplacer API is shown below:
{
  "body": {
    "data": {
      "externalIdUpsert": {
        "status": 200,
        "errors": null,                 👈 No errors
        "externalId": {                 👈 The external Id has been attached
          "key": "HubSpotId",
          "value": "163772320956",
          "owner": {
            "id": "U2VsbGVyLTEz",
            "legacyId": 13,
            "updatedAt": "2025-05-31T00:15:10+10:00",
            "externalIds": [
              {
                "key": "HubSpotId",
                "value": "163772320956"
              }
            ]
          }
        }
      }
    }
  },
  "status": 200
}
Final thoughts
- The aim of this example was to demonstrate some core Marketplacer integration concepts, the choice of tech to perform that integration (Huginn in this case) could of course be swapped out for something else
- The creation of a company in HubSpot is fast enough to make a call synchronously, for longer running calls (e.g. a batch type situation), rather than waiting for the response from the 3rd party (HubSpot in this case) you could employ webhooks to undertake the same type of process in an asynchronous way (assuming the 3rd party supports this).